Processing Ajax...

Title
Close Dialog

Message

Confirm
Close Dialog

Confirm
Close Dialog

Confirm
Close Dialog

Working with DisplayFusion Monitor Profiles

March 5, 2014
DisplayFusion Monitor Profiles store your various monitor configurations for easy transition. This is ideal for laptop users who may have different monitor setups at home, work, etc.
  • Open the DisplayFusion Monitor Configuration window by right-clicking the DisplayFusion tray icon and clicking "Monitor Configuration" (also accessible via the Options tab in Settings).
    Tray Menu - Monitor Configuration
  • Configure your monitors and click the "Apply" button to test your settings.
    Save New Profile
  • Click the "Save Profile" button and choose "New Profile."
  • Enter a name for the Profile and click OK.
  • Open the DisplayFusion Monitor Configuration window by right-clicking the DisplayFusion tray icon and clicking "Monitor Configuration" (also accessible via the Options tab in Settings).
    Tray Menu - Monitor Configuration
  • Configure your monitors and click the "Apply" button to test your settings.
    Modify Profile
  • Click the "Save Profile" button, then select the Monitor Profile that you want to overwrite.
  • Click Yes on the confirmation prompt.
  • Open the DisplayFusion Monitor Configuration window by right-clicking the DisplayFusion tray icon and clicking "Monitor Configuration" (also accessible via the Options tab in Settings).
    Tray Menu - Monitor Configuration
  • Click the "Manage Monitor Profiles" button.
    Manage Monitor Profiles
  • Select the Monitor Profile you'd like to rename and click the "Rename" button.
    Rename Monitor Profiles
  • Enter a new name for the Monitor Profile and click OK.
  • Open the DisplayFusion Monitor Configuration window by right-clicking the DisplayFusion tray icon and clicking "Monitor Configuration" (also accessible via the Options tab in Settings).
    Tray Menu - Monitor Configuration
  • Click the "Manage Monitor Profiles" button.
    Manage Monitor Profiles
  • Select the Monitor Profile you'd like to rename and click the "Delete" button.
    Delete Monitor Profiles
  • Click Yes on the confirmation prompt.
  • Open the DisplayFusion Monitor Configuration window by right-clicking the DisplayFusion tray icon and clicking "Monitor Configuration" (also accessible via the Options tab in Settings).
    Tray Menu - Monitor Configuration
  • Click the "Manage Monitor Profiles" button.
    Manage Monitor Profiles
  • Select the Monitor Profile to which you'd like to assign a key combination.
    Key Combination Button
  • Click the "Key Combination" button and choose "Set Key Combination."
    Key Combination
You can add a button in Windows title bars to quickly load a Monitor Profile without needing to access a DisplayFusion menu.
  • Open the DisplayFusion Settings window by right-clicking the DisplayFusion tray icon and clicking "Settings."
    Tray Menu - Settings
  • Click the "Functions" tab and ensure the "Enable TitleBar Buttons" checkbox is enabled.
    Enable TitleBar Buttons
  • Scroll down in the Functions list and select your Monitor Profile from the "Monitor Configuration" section.
    Add TitleBar Button
  • Click "Add TitleBar Button."
  • Select the TitleBar Button Image Set, the TitleBar Button Image, and click OK.
    TitleBar Button Image Selection
  • Click Apply.
DisplayFusion can be configured to automatically load a Wallpaper Profile or Desktop Icon Profile when a specific Monitor Profile is loaded or detected. This is especially helpful if Windows moves your Desktop Icons around on restarts.
As soon as DisplayFusion starts up and detects your previously saved Monitor Profile, it will automatically load the associated Wallpaper and Desktop Icon Profiles without intervention.
  • Open the DisplayFusion Monitor Configuration window by right-clicking the DisplayFusion tray icon and clicking "Monitor Configuration" (also accessible via the Options tab in Settings).
    Tray Menu - Monitor Configuration
  • Click the "Manage Monitor Profiles" button.
    Manage Monitor Profiles
  • Select the Monitor Profile to which you'd like to assign a Wallpaper or Desktop Icon Profile.
  • Click the "Wallpaper Profile" or "Desktop Icon Profile" button, and choose the appropriate Wallpaper or Desktop Icon Profile.
    Select Wallpaper Profile
If you need to load a Monitor Profile via the command line, you can use displayfusioncommand.exe (located in the directory where DisplayFusion is installed).
The command is as follows:
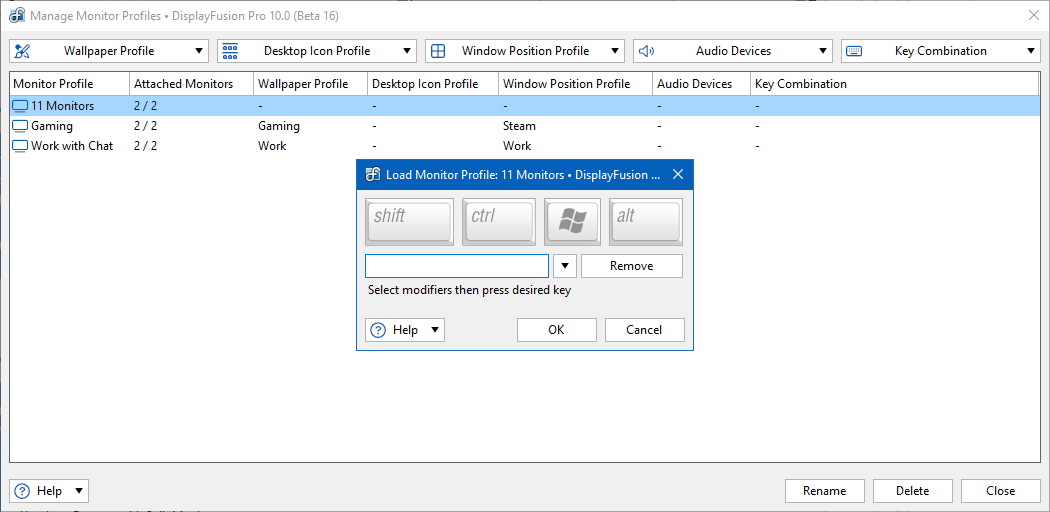
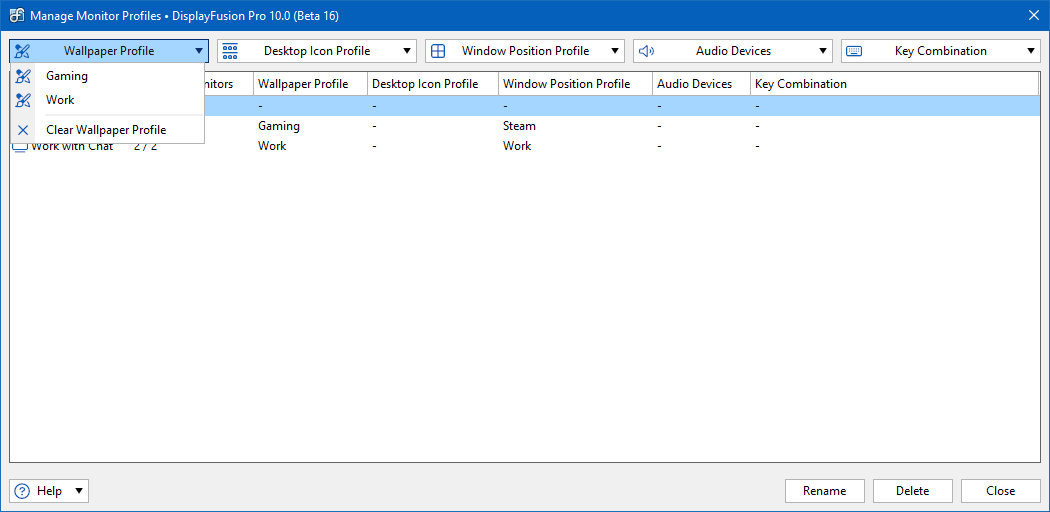
displayfusioncommand.exe -monitorloadprofile "profile name"
Load Monitor from Command Line
If you'd like to load a Monitor Profile automatically on startup, you can create a shortcut in your startup folder that will run the command in the previous section.
For the full set of instructions, see Loading a Monitor Profile on Startup.
There are a few Monitor Configuration related settings in the DisplayFusion Settings > Advanced Settings window. The most useful one is the option to disable the confirmation prompt when changing monitor settings. If you switch Monitor Profiles often, you may wish to disable this prompt to make the process easier.
Note: If for some reason your monitors are unusable after a settings change, DisplayFusion won't be able to revert back to the original settings if the confirmation prompt is disabled. You'd likely need to reboot your machine to make the displays usable again.
  • Open the DisplayFusion Settings window by right-clicking the DisplayFusion tray icon and clicking "Settings."
    Tray Menu - Settings
  • Click the Advanced Settings button.
    Advanced Settings
  • Search for and double-click "Don't Show Confirmation Prompt" Setting.
    Settings
  • Select "Confirmation prompts are not shown" and click OK.
    Confirmation

Customizing the DisplayFusion Taskbar

February 12, 2014
By default, the DisplayFusion taskbar will match the behaviour of the Windows taskbar, but the DisplayFusion taskbar has a wealth of customization options. This document covers some of those options and where to configure them.
Some settings affect all DisplayFusion taskbars. These global taskbar settings are in the Taskbar tab of DisplayFusion's Settings.
  • Right-click the DisplayFusion icon and click "Settings."
    Tray Menu - Settings
  • Click the Taskbar tab.
    Taskbar tab
Taskbar Tab
This area allows you to:
  • Enable Multi-Monitor Taskbars
  • Enable Jump Lists
  • Enable focus, full screen, and transparency options
  • Set Taskbar Modes (windows display options)
  • Set the Taskbar Button Middle-Click Behaviour
  • Select the Windows Preview Style
  • Set Taskbar Opacity
The DisplayFusion taskbar allows you to add different types of shortcuts to the taskbar. You can add regular application shortcuts, like the Windows taskbar, but you can also add shortcuts to files, folders, and websites.
Taskbar Shortcuts are in the Taskbar tab of DisplayFusion's Settings.
  • Right-click the DisplayFusion icon and click "Settings."
    Tray Menu - Settings
  • Click the Taskbar tab.
    Taskbar tab
  • Click the Taskbar Shortcuts button.
    Taskbar Shortcuts button
From here you can add all of the shortcut types (Application, File, Folder, Website), and also edit, rename, re-arrange, and specify custom icons for the shortcuts.
Shortcuts
Applications, Folders, and Websites shortcuts start on the same monitor as the taskbar by default.
You can disable this action by disabling the "Force [shortcut] to open/start on same monitor as Taskbar" checkbox. On Applications you also have Administrator and Metro options as well as the ability to use Command Line Arguments.
Application Shortcut Details
Application shortcuts can also be added by right-clicking a button on the DisplayFusion taskbar and choosing "Pin this program to Taskbar."
Pin to Taskbar
Each taskbar element (Start button, shortcuts, application buttons, system tray, clock, and show desktop button) can be moved to either side of the taskbar, or disabled completely.
Right-click a blank space on any DisplayFusion-controlled Taskbar and select "Multi-Monitor Taskbar" to bring up the submenu options.
Multi-Monitor Taskbar
Multi-Monitor Taskbar Menu
This menu allows you to:
  • Control the Size and Position of the taskbar
  • Set the Auto-Hide option
  • Set the visibility and location of the System Tray Clock, System Tray Icons, Start Button, Show Desktop Button and your Shortcuts. There is also a link to Edit Shortcuts.
  • Choose the Alignment, Style, and Grouping of Buttons
Below are some examples of configured Taskbars.
Example 1 - Left Position, Start Button Disabled
Left Position, Disabled Start Button
Example 2 - Shortcuts Left, Start Button Disabled, Button Alignment Middle
Shortcuts Left, Start Button Disabled, Button Alignment Middle

BinaryFortress

January 24, 2014

We're very excited to announce that we've rolled out our newly re-designed websites over the past couple of days! Along with the new visual design, there are some functionality improvements that we'd like to share with you:

Easier Account Access

You can now access your account information from the top-right of each site, instead of having to login to each site's specific portal.

My Account Link
My Account Link

Easier License Access

Once you're logged in, you can access your license information by using the "My Licenses" link at the top of every page.

My Licenses Link
My Licenses Link

Single Sign-On

Now when you login on one of our sites, you'll automatically be logged in to any of our other sites that you visit. No more logging in to each Discussions forum individually!

Auto Login Message
Auto Login Message

Improved Navigation Bar

We've made it easier to move between the sites for our various products, using the new product bar at the top of each site.

New Product Navigation Bar

We encourage everyone to check it out, and as always, if you have any issues, questions or feedback, please don't hesitate to contact us.

All Products on Sale for Black Friday/Cyber Monday!

November 27, 2013

Update: This sale has now ended. Thanks everyone!

It's that time of year again! Black Friday and Cyber Monday are upon us, and we're rolling out the sales with a 50% discount on all products until December 3rd! Whether you're in the market for DisplayFusion Pro, ClipboardFusion Pro, FileSeek Pro or LogFusion Pro, take advantage of this amazing sale and grab a great deal!

DisplayFusion: Wallpaper Configuration
ClipboardFusion: History Menu
FileSeek: Main Search Window
LogFusion: System Event Log with Highlights

DisplayFusion 5.1.1 Now Available!

November 27, 2013

Update: This sale has now ended. Thanks everyone!

We're pleased to announce that DisplayFusion 5.1.1 is now available for download, and also on sale for 50% off until December 3rd! This release mainly consists of bug fixes and various performance improvements to the features that were added in 5.1.

All of our other products are also on sale, so feel free to check out ClipboardFusion, FileSeek and LogFusion as well!

DisplayFusion 5.1.1 Highlights

  • Improved Window Location and taskbar shortcuts when using monitor splitting
  • Improved window maximizing when using monitor splitting
  • Send Windows Store App to Desktop Function now works in Windows 8.1
  • Resolved a screen saver issue when running spanned without preview mode enabled
  • Fixed an issue where DisplayFusion would cause a "No disk in drive" error message
  • Fixed an issue where desktop Wallpaper could stop updating until next reboot
  • DisplayFusion Photos Screen Saver now hides the mouse cursor and allows the computer to sleep
  • Resolved an issue that would cause Directory Opus desktop double-click to stop working
  • New option to disable Aero transparency for all taskbars, including Windows taskbar
  • Improved compatibility for supported Start menu replacement apps
  • Fixed some issues related to Windows 8.1 Aero Peek and per-monitor DPI scaling

Updating DisplayFusion

We encourage everyone to update to this new version today to take advantage of these improvements. If you've already purchased DisplayFusion, it's a lifetime license, so you can upgrade to this version at no cost! If you would like to see a complete list of all the changes, please visit the DisplayFusion Change Log. We'd like to send out a big thanks to the dozens of people who helped with the DisplayFusion translations, and the thousands of people that helped test the Beta versions. Thanks everyone!

DisplayFusion 5.1.1 Screenshots

Monitor Splitting
Monitor Splitting
Windows Store App in Desktop Window
Disable Taskbar Transparency Option

Working with Custom Functions

October 21, 2013
DisplayFusion has many built-in Functions for moving, sizing, or otherwise manipulating program windows. If you have a particular need that can't be fulfilled by the built-in Functions, you can also create custom Functions.
The basic steps for creating a custom Function are as follows:
  • Right-click the DisplayFusion tray icon and click "Settings."
    Settings
  • Select the "Functions" tab, click the "Custom Function" dropdown and select the "Add Custom Function" option.
    Add Custom Function
  1. Name your Function.
    Name
  2. Click "Edit" to assign a Hotkey (optional)
    Hotkey
  3. Select the Function Action
    Function Action
Each Function Action option has its own additional configuration options. Selecting the Function Action from the dropdown alters the Create Function window as shown below.
"Manage Window" options are for moving and resizing the selected window.
The "Window Screen Action" dropdown addresses the larger movement and sizing options, such as moving the window to a specified monitor and altering its size.
Window Screen Action
The other dropdowns allow for more detailed window alignment and sizing configurations.
Align and Size
For exact positioning, drag the blue target icon onto the window at its current and desired location. You'll see the X, Y, Width and Height values automatically populate.
Drag Blue Target
Positioning
This option will alter the transparency of the window using increments from 0 to 100.
Transparency
This option moves the mouse cursor to the centre of a monitor of your choosing. Select the monitor or split from the Monitor preview.
Move Cursor
This option moves the cursor to an exact location, specified by X and Y values.
Move Cursor
This option lets you specify an application to launch. Click the "Select Application" button to choose from a list. You can also "Browse" for the file or drag the blue target over an open window to select its process file / executable file.
Application
Selection Window
  • When finished configuring your Custom Function, click "OK."
  • To add your Custom Function to windows as a TitleBar Button, select the Function from the list and click "Add TitleBar Button." The "Enable TitleBar Buttons" checkbox must be enabled.
    TitleBar Button
  • Select the button style by choosing the Image Set and Image from the dropdowns, then click "OK."
    TitleBar Button
  • To apply and save your Custom Function changes, click "OK."
    OK
Move and Resize
Move the window to the centre of monitor 2 and size to 75% width and 60% height
Span
Span the window across only 2 monitors in a 3 monitor setup
Centre
Move window to current monitor and size to 800px width and 600px height
First Page
Previous Page
1
2
3
4
5
6
7
8
9
10
11
12
13
14
15
16
17
18
19
20
21
22
23
24
25
26
27
28
29
30
31
32
33
34
35
36
37
38
39
40
41
42
43
44
45
46
47
48
49
50
51
52
53
54
Next Page
Last Page